Thursday, June 30, 2011

PVC Pipe Flag


Hey everyone!

I don't know why, but I keep seeing PVC projects. PVC is really so easy to work with - I never imagined that so many things could be made with it! I absolutely love this idea!  It looks very easy to make and would be very durable to hang on your door!

The instructions are here:  A Creative Princess: PVC Pipe Flag  Check it out!

Oh my - another project for my to do list - it's getting really, really long!!!!!!!!!!

Have a great day - see ya soon!
Photobucket

Wednesday, June 29, 2011

Glow-in-the-Dark Drinks

Good morning!

With Independence Day drawing close, I just couldn't resist passing these  imaginative drinks along to those of you with kiddos!  But hey - why wait until the 4th of July - why not make them just because.  Summer nights are meant for firefly catching, and sleeping in a tent along with a multitude of other things that can only be done during the warm summer nights!  I think this idea is very creative and would be very cool to do anytime!!  Don't you?

Intrigued, yet?  Well just go here to see how to amaze your kids:
Come Together Kids: Glow-in-the-Dark Drinks
Have fun sipping your glow in the dark drinks!  See ya soon!
Photobucket

Tuesday, June 28, 2011

Patriotic Wreath - Completed PVC Kid Sprinkler

Good morning!

Well, the 4th of July is quickly drawing upon us.  It's makes me sorta sad because it has always felt like summer was half over (at least it felt like school summer vacation was).  But I love this holiday not only for what it signifies but red, white, and blue - just love those colors.

I'm wishing I had time to get this wreath made before Monday but I just don't see it in the cards.  It definitely will be done before next year for sure!!!  If you want to make one for your self just go here and check it out:

Burlap & Denim Ruffled Patriotic Wreath  Thanks to mmscrapshoppe for the awesome tutorial!


Also, we fixed the water gun problem last night on the PVC Sprinkler - it changed the design a little (surprisingly it made the structure more stable) but Cristian is happy and that's all that matters!  Here's the finished product and I know it will insure many hours of cooling!


Have a terrific Tuesday!  See ya soon!
Photobucket

Monday, June 27, 2011

Our DIY PVC Kid Sprinkler

Hi, everyone!  Here are the pics from our handiwork yesterday!  We are still making minor changes but it's pretty much done.  Not quite as fancy as the Family Fun Magazine version but it sure does spray the water - that's the whole point - right?

Check it out - 
All the supplies to build our sprinkler!

One side assembled!

Second side assembled!

Almost done!

Oops - hose problem!

Trying to fix hose problem!

Minor adjustment and up and going!

Dad and son getting cooled off!!!!!

Cool sprinkler close up!

See the misters?

Set up with tarp and pool at the end!


All and all, this was a simple project.  The hardest part was finding the piece to connect the hose!  My hubby cut the PVC while I assembled. We decided not to add the sponges and lawn chair webbing but instead added the round sprinklers and spray misters. The water guns were a great idea but we haven't quite worked out the kinks in our design - but I have an idea that just may fix it!  I'll post that when we have it done.  

But in the meantime - Cristian is loving it!!!  In fact, he's outside at this very minute having a blast!

Hope this inspires you to build your very own for your kiddos!  Have a terrific Monday - see ya soon!
Photobucket

Sunday, June 26, 2011

Lobster Rolls Recipe

Good Morning!


I hope your weekend has been great so far.  Today, we are building the Deluxe Kid Wash PVC Sprinkler after a quick trip to Lowe's Home Improvement!  I cannot wait to get it done for Cristian.  We've decided to add a few little extras and not include a few others.  I'll be taking pictures and will post them for all of you to see!

But in the meantime, doesn't this sandwich just make your mouth water? I'd really like to make one right now!  If you want the recipe - just go here:
Lobster Rolls at Ginas Skinny Recipes


There are tons of wonderful recipes on this site - take some time to look around!

Have a good day and stay tuned for the PVC Sprinkler pictures!  See ya soon!

Photobucket

Saturday, June 25, 2011

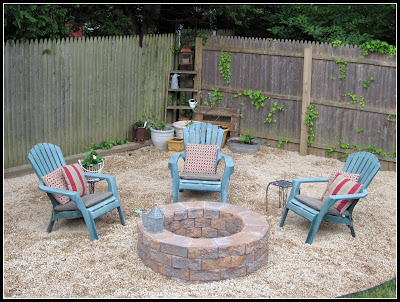
DIY - Build a Firepit

Happy Saturday!


I'm adding yet another outdoor project to my hubby's honey do list!  If you are like us, you enjoy time outdoors.  Wouldn't you love to have a firepit area?  I know I would.  Since we are in the planning stages of putting in a patio, I'm really liking the idea of adding a firepit!

I came across this post the other day and I'm totally inspired now to do this (I just hope hubby is too - LOL!)  Go here to check it out: Building a Firepit...


Lovely isn't it?  Happy building and see ya soon!
Photobucket

Thursday, June 23, 2011

DIY PVC Summer Camp Chair Tutorial

Good morning!

I know I've been MIA the last couple of days....but I've been enjoying time with my friend Michele's daughters!  It's been a blast.  We made paper beads on Tuesday and yesterday the kids played on the slip 'n slide for 3 1/2 hours.  No easy task since it was in the upper 90's here yesterday!  But hey - just add water and the kids will be cool and entertained for hours!!!!!

Today's post is something that every kid would appreciate!  A chair just for them!!  And it appears to be pretty easy to make.  I just love the fabric and the monograms - sooo cute!  Go here to check it out:

Summer Camp Chair Tutorial (That you can make yourself!)

I keep wondering if I could make one of these for myself!  LOL!!!!

Anyway, have a great day and I'll see ya soon!

Photobucket

Monday, June 20, 2011

Simple DIY PVC Sprinkler

Good Afternoon all.

I know, I know - twice in one day - what gives?  Well, I got to thinking that there may be some of you that would like to build a PVC Sprinkler but not quite as elaborate as the one featured in Family Fun Magazine.  (It's a post below if you missed it!)

So I'm sharing this version from cometogetherkids blog here: 


KidWash: PVC Sprinkler Water Toy

Simple, but still gets the job done!  So whichever version you choose to make - have fun cooling off! C'ya!
Photobucket

The Deluxe Kid Wash - DIY PVC Sprinkler

Good Morning all.

I know that everyone had a wonderful day yesterday honoring Dad.  Since my hubby works 6 days a week it's about quality of time versus quantity of time. We most definitely look forward to Sundays. Yesterday was no exception and was even better since it was Father's Day!

I may have mentioned in a previous post that I've been a subscriber to Family Fun magazine for many, many years.  I think I started getting the magazine when Cristian was about 2 years old and he'll be 9 in September!  It truly is a terrific place to get information about just about anything you can think of that involves family and kids and the website is even more comprehensive.

Anyway, I'm sure you've been seeing the DIY PVC sprinklers for kids all over the web.  In fact, there are several that are pretty cool.  I think it is a great alternative to the expense and work of a swimming pool or a blow up water slide.  Again, Family Fun Magazine comes to my aid.  Check This Out and get the complete instructions here:


The Deluxe Kid Wash

Cristian cannot wait!  Next weekend we plan to build this as a family project! The only thing we are going to change is instead of the lawn chair webbing we are putting spray misters in that spot!  But really - how totally cool is this??!!!  Maybe Dad and I will even get cooled off - why not, right?

Well, I hope this inspired you to get crafty and cool your kiddos off at the same time!  I'll definitely be posting pictures once this project is complete so stay tuned!

Have a fantastic Monday - see ya soon!
Photobucket

Saturday, June 18, 2011

Cute "TEE" tote

Good Saturday to all!!

It's almost Father's Day - are you ready?  Cristian has his gift and we plan on spending some quality time with Dad tomorrow!

I think that everywhere I look - there are T-Shirt crafts.  I thought this was a really cute tote to make.  A t-shirt into a bag - and you know I have a weakness for purses and bags!  This could possibly be one of my new favorites.  And this is so going on my to do list - how about yours?  Check it out here:      Brassy Apple: The Craf "TEE" tote........tutorial


Have a wonderful rest of your weekend and to all you Dads out there - Happy Father's Day!  C'ya!

Photobucket

Friday, June 17, 2011

"Football Fold" a Plastic Bag and Fledge Watch

Thank Goodness It's Friday!  First full week of summer vacation is over already - and it went pretty fast.  We sorta just kicked back.  I spent an afternoon with my friend Michele's girls making fabric covered photo boards - they came out soooooo cute!  (Sorry, I forgot to take a picture.) I may even have to make one for myself and Cristian!

Today I need to go to the grocery store and I've put it off all morning.  I'm just not in the mood today - but alas it must be done!  It's Friday Night Game Night and I need to pick up a few things.  Hamburgers and hot dogs on the grill - sounds like a picnic to me!

Cristian and I have been on Eagle Fledge Watch the past couple of days.  (You can watch too - go here: Decorah Eagles on Ustream) The eaglets are now about full size and preparing to fly.  It's bittersweet really.  I'm excited to see them fly but, sad to see them go.... It's seems like they were just hatchlings and now they are going to fly.  I really hope we catch it live - but if we don't I know there will be available video on YouTube. 

So on to today's find.  If you are like me you save your plastic grocery bags to use for other things.  But, if you have as many as I do then they are taking over just like mine! This idea is actually pretty cool.  I'm not sure I will take the time to do it but boy it sure would solve the storage problem, wouldn't it?  It's nice to know there is a solution out there.  So if you want to fold your plastic bags using the 'football fold' then go here and check it out!

How to Football Fold Your Plastic Grocery Bags  (the instructions are toward the bottom of the post)

Well, I suppose I've put if off long enough - I'm off to the store.  Have a fantastic Friday and I'll see ya soon!
Photobucket

Thursday, June 16, 2011

Money Flowers for the Graduate

Good Morning!

It's now graduation time and this would be a unique way to give your graduate the gift of money.  She would certainly love a bouquet made of money flowers!

Not only would this be nice for the graduate but also for a birthday or even a retirement or bridal shower or.....well you get the picture.  Anytime money is the intended gift this might just fit the bill!  Go here to check out how to make it and see the full bouquet:

Polka Dot Pineapple: Tutorial--Ruffled Flower Money Bouquet


Have a super day!  We'll chat soon.

Photobucket

Monday, June 13, 2011

Adorable Anthro Knock-off Bag

Good Morning and Happy Monday!

I hope your weekend was great.  Mine seemed to go by very quickly - probably because we went to dinner with our friends without the children. You know that no kid time always goes by way too fast!!!  But, we had a nice dinner at San Jose along with adult beverages - margaritas, to be exact - wonderful!

Anyway, I've always really liked purses and shoes.  Sadly, the ones I usually like are on the expensive side.  So I'm always happy to find a bargain.  What a better bargain than one you can make yourself?  I'm definitely putting this project on my ever growing to do list!  In fact, I have a fairly new sewing machine and a super nice sewing table just waiting to be used (my Hubby got it for me several years ago and since I never really learned to sew that well - it sort of just collects things on top for now.  My intent had been to learn how to machine quilt - but that's another story altogether!).  So as soon as I figure out the sewing machine I'll get to work on this - check it out:

Anthro Knock-off Bag with Printable Pattern at thelittleappleseed.blogspot


Even though I really like this bag - I certainly wouldn't pay $498 for it - would you? But I'm certainly keeping the pattern so I can make one for myself and now you can too!

Have a terrific rest of your day and we'll chat soon!
Photobucket

Friday, June 10, 2011

Swarovski Crystal-Embellished Handbag

Good morning!  It's TGIF and the LAST day of school!!!!!  Hurray!

Just a short post today since school lets out early today and I have some stuff I want to do before I go get Cristian.  I want to show you a cool thing you can do with Hot Fix Crystals.  Read on......

Aren't these bags absolutely gorgeous!!!  They are made by Designer Silvia Tcherassi.  As you'll see on her website, one bag costs in the ballpark of $850 to $1500!  Can you even think about paying that for a single handbag?  I know I can't!! 

Well, now you don't need to lay out that kind of cash!  You can make your very own - and thanks to Martha Stewart for showing us how it's done!  She had Silvia on her show and the technique is really quite simple.  (Be sure to check out the video, too.) Go here to find out more:


Have a wonderful day!  I'm off to make brownies for our brownie sundae dessert tonight - Yummy! See ya soon!

Photobucket

Thursday, June 9, 2011

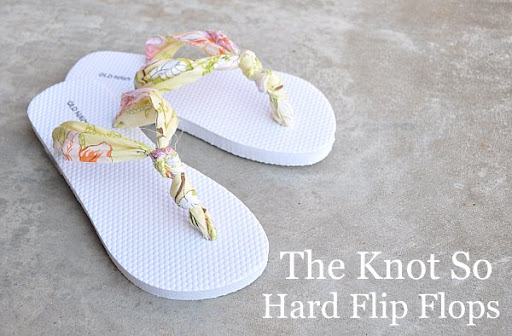
Flip Flop Re-Do

Good morning!

I don't know about you but I love sandals and flip flops in the spring and summer.  If I can't be barefoot then flip flops are for me!  But sometimes that little piece that goes between the toes doesn't feel so good, right?

Here is the perfect solution!  It won't work for all flip flops, but it will certainly take an inexpensive pair and make them look fabulous!!!!!!!!!!  It also helps with the little annoying piece between the toes - yippee!

Big thanks to themotherhuddle.com!  Go here to check out the easy DIY tutorial:

DIY - The Knot So Hard Flip Flop


Don't you love 'em?  Cute, cute, cute!!! Just think you could virtually have a pair in every color! I'm definitely putting this on my to do list (which keeps getting bigger and bigger with each and every day - LOL).

Have a fantastic day! 
Photobucket


Wednesday, June 8, 2011

Danish Aebleskivers


Good morning!

If you are wondering what a Danish Aebleskiver is - then this post is for you! I have been wanting this pan for the longest time. It is also available at Williams Sonoma but in my opinion is a little pricey at $40. But now I've found my favorite site for everything that involves baking, The Prepared Pantry!!

This site has it all - recipes, tools, mixes, ingredients, supplies, gifts - positively amazing!!!! Anything and everything you could possibly want or need to make some awesome things. I so wish I had found this site before Mother's Day, but I have a birthday coming in September - LOL!!!!  (Maybe my hubby will get it for me early.)

There are so many variations with these little pancake puffs - the sky is virtually the limit.  Breakfast, snack, or dessert - the choice is yours to make!  The link below for the pan and mix combo also has a YouTube video showing how to make these delectable little treats - chocolate with chocolate filling!!! So Yummy. After watching you may just order your pan today!

Recipe for Danish Aebleskivers as shown at preparedpantry.com:


A holiday in Denmark often begins with a breakfast of puffy little pastries called aebleskiver (ebleskiver). Traditionally, they are made with an apple filling or served with applesauce (hence their name). Like other great pastries, wonderful variations have evolved. You’ll love aebleskiver with jam fillings and cream cheese fillings.

Ingredients

2 cups all-purpose or cake flour
1 teaspoon salt
1 teaspoon baking soda
3 large eggs
2 cups buttermilk
filling of your choice
powdered sugar

Directions

Aebleskiver1. Mix together the flour, salt, and baking soda.
2. Separate the eggs, the yolks from the whites. Set the yolks aside. Beat the egg whites until light and fluffy and soft peaks form.
3. Add the egg yolks and the buttermilk to the flour mixture and stir until combined. Gently fold the egg whites into the batter.
4. Grease your aebleskiver pan with a spray dispenser or with butter (spray your pan again as needed). Heat the pan over medium heat. When hot, fill each cup one-third full with batter. Add a small amount of filling to each. Cover with an additional one-third batter. (Try using the Medium Quick Release Scoop to cleanly drop the batter into the cups.)
5. Cook for one to one and one-half minutes before turning. (You can turn your aebleskiver with a toothpick or skewer.) Cook for another minute or until done. Remove to a plate and sprinkle with powdered sugar. Serve warm.


The recipe above is from scratch but The Prepared Pantry has many mixes to choose from.  If you want to make your own Aebleskiver then you must check out this deal!!!

Danish Aebleskiver Pan and a free mix can be yours for the amazing price of $26.99 - and it's cast iron to boot!  Sign me up!

Happy baking!!  Have a great day.  See ya soon. 

Photobucket

Monday, June 6, 2011

Make a Crib Bench

Good morning and happy Monday to all!!!

Unbelievably, our son is almost 9 years old and we still have his crib stored in the garage.  For some reason I just can't bear the thought of getting rid of it! I suppose it's because I'm emotionally attached - more sentimental that anything else. 

But now I've got the perfect solution!  I'm so in love with this idea that I can't decide which project to do next - this or the privacy screens!  Take a look see at this: Make a Bench out of an old Crib at tatertotsandjello.blogspot.com


Isn't that a wonderful idea?  If my porch were covered it would definitely go there but I'm thinking it may find a home inside somewhere.  Where? - I'm not sure yet but I'll find a spot!!!

If you've got your child's crib stored away - why not give it a new life!!  I'd love know if you do!

Have a fabulous day!  Cya!

Saturday, June 4, 2011

Photo Blocks and Stamped Lucky Penny for EOG

Happy Saturday!!

As promised, I am posting about the project for the 1st graders in my friend Michele's classroom.  She was looking for something to give them as an end of year gift along with the Shutterfly Memory book that she traditionally does.  (If you've never done a memory book at shutterfly you really ought to - hers always comes out so darling!!)

Anyway, I digress.  Here is a picture of the sides of the photo blocks (I just noticed that I forgot to include the group pic side - oops):


I think they came out very nice and hope the kids and their parents like them.  They were not hard to make at all - it just took some planning and time.  I've seen photo block tutorials all over blogland and was tickled to be able to make some for Michele. 

I wanted to do them with Mod Podge but since they needed to be ready for next Tuesday that made it difficult to do since it requires several coats and drying time in between!  And with 18 blocks to make it would have been a long process!!!  So I had to come up with an alternative plan.  I decided instead of using Mod Podge I would laminate the pictures for each side and affix them with glue.  And you can see the end result above!  If you want to try your own here is what I used.

Supplies:

(1) 4x4 pressure treated post, 6 feet in length and cut into even sized blocks

hand sander and 80 grit sandpaper

white acrylic paint (we did 3 coats)

foam brushes

pictures or graphics printed on plain paper (ours are 6 sided but next time, only 5 with cork on the bottom would be better)

laminator and laminating sheets (i used my Purple Cow laminator and 3 mil sheets)

scissors

cotton swabs

Elmers AND Krazy Glue

Making Them:

My Darling Husband cut the post into 3.5" square blocks for us and Michele and I sanded and painted them.  We came up with the designs and pictures we wanted to use (I used PSE 9.0) and then printed them on plain paper.  That worked well since they ended up getting laminated and were thin and easy to adhere smoothly onto the block.  (FYI - the dimension of the graphics were 3.25 x 3.25) Cut them out. To affix them I put a dab of good old Elmer's school glue on the center of the side I was working on and spread it with a cotton swab. Then the Krazy Glue went directly on the laminated pics edges to insure they stuck well.  I suppose there are other glue products I could have used, but I had Elmer's and Krazy glue on hand!  As I said before, next time I would only do 5 sides and put cork on the bottoms of the blocks. 

And there you have it!  Photo Blocks 101 - LOL!!!!  Here's a close up of one of the sides (we're the Belmont Bees - can you tell??):


(Sorry about the flash glare!)

And I took a picture of Cristian's EOG Lucky Penny since I forgot to do that before I sent the set to school for his class.  I used all different colors behind the poem and Cristian got a green one!  Take a look:


My husband and I came up with the poem.  The kids were a nervous wreck about the End of Grade tests they were going to take.  We hoped this would be a confidence builder along with the cards of encouragement that each parent sent for their child on the days of the test.  I shined up 54 pennies and stamped the word lucky on them.  Then put the whole thing in a little bag that I found in the craft section at Walmart.  Cute, huh?

Well, I've rambled on long enough today....  Have a wonderful Saturday!  See ya soon. 

Photobucket